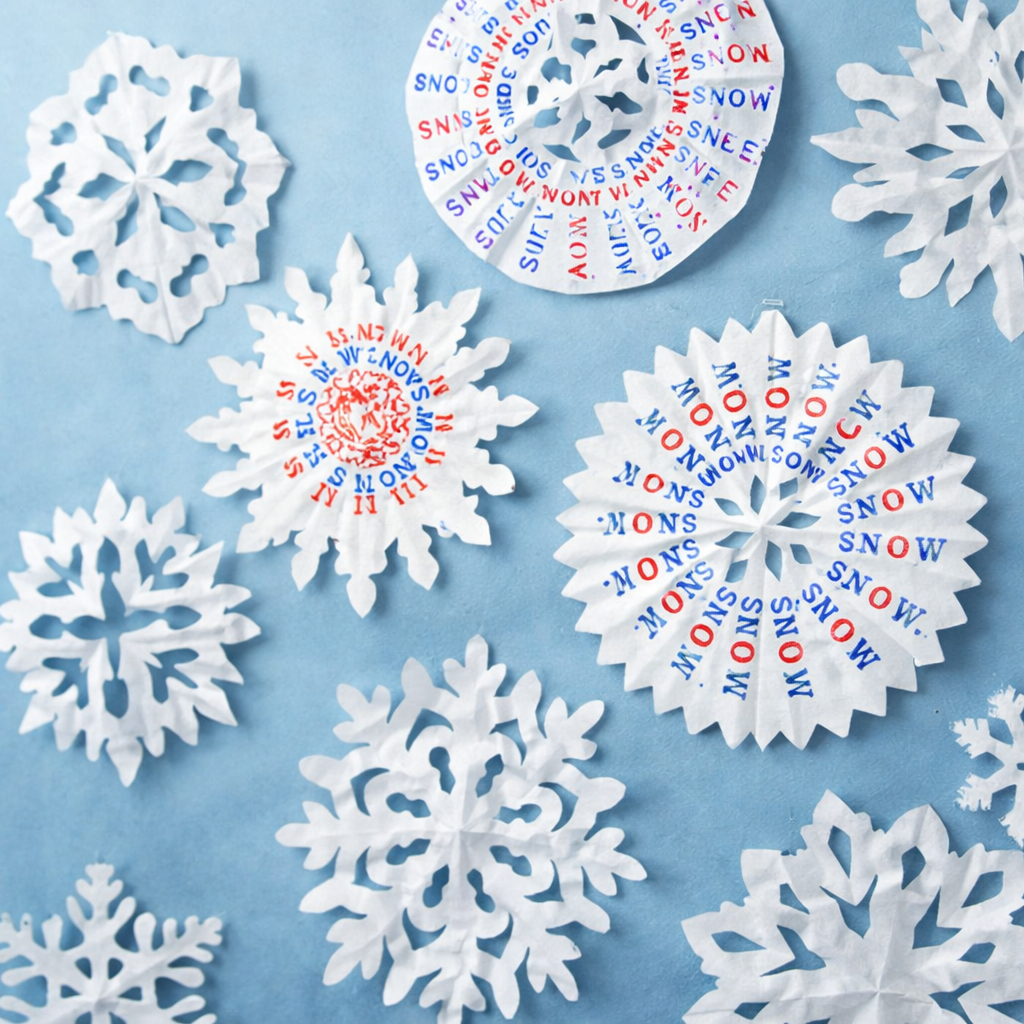
Coffee Filter Snowflakes With A Message
Coffee Filter Snowflakes With a Message is a simple winter craft that turns ordinary coffee filters into pretty paper snowflakes. Kids can have fun cutting their own unique designs and adding a special word or short message in the center. This is an easy activity for snowy afternoons, classroom craft time, or winter bulletin board displays.
Supplies
- Coffee filters
- Scissors
- Alphabet stamps and stamp pad, optional
- Marker, optional
Instructions
- Flatten a round coffee filter.
- Fold the coffee filter in half.
- Fold it in half again.
- Fold it one more time so you have a small wedge shape, just like you would when making a paper snowflake.
- Leave the pointed top section uncut so the snowflake stays connected in the middle.
- Cut small shapes along the open edges to create your snowflake design. Try triangles, curves, and tiny half circles for different looks.
- Carefully unfold the coffee filter to reveal the finished snowflake.
- If you would like to add a message, stamp a winter word or short phrase in the center. You can also write a message with a marker if you do not have stamps.
- Let the ink dry before hanging or displaying the snowflake.
Fun Facts
Snowflakes all form from ice crystals, and each one grows in its own special pattern.
Paper snowflakes are a favorite winter craft because every design turns out a little different.
Coffee filters work especially well for this project because their round shape makes them look naturally snowflake-like.
Patterns, Templates and Printables
This project does not require a printable template. Just use round coffee filters and fold them like traditional paper snowflakes. Add stamped words or handwritten winter messages to make each one extra special.
Teacher Friendly Educational Extension
This craft works well for a winter classroom activity because it blends art, fine motor practice, and simple language skills.
Have students write one winter word in the center of each snowflake, such as snow, cold, mittens, or winter.
Invite children to describe their snowflake patterns using math vocabulary like points, curves, lines, and symmetry.
Create a classroom display by hanging all of the snowflakes together in a window or on a bulletin board. Students can compare their designs and talk about how each one is different.
Supplies
Coffee Filters
Stamp Pad and Alphabet (optional)
Scissors
Instructions
Fold the coffee filters in the same way that you would to make regular paper to make snowflakes. Just don't cut off the top.
Fold the coffee filter in half, then half again and one more time and cut out your own unique snowflake pattern.
If you want to punch it up. Stamp your snowflake wth wishes for snow or leave them plain.
Contributor
Visit me at CreativeJewishMom.com. on the exciting journey of giving greater meaning to the everyday through creativity. This blog is my way of sharing with you the joys of crafting, decorating, cooking, and gardening. I love simple ideas, recycling and quick transformations.