Flying Pigs Easter Eggs
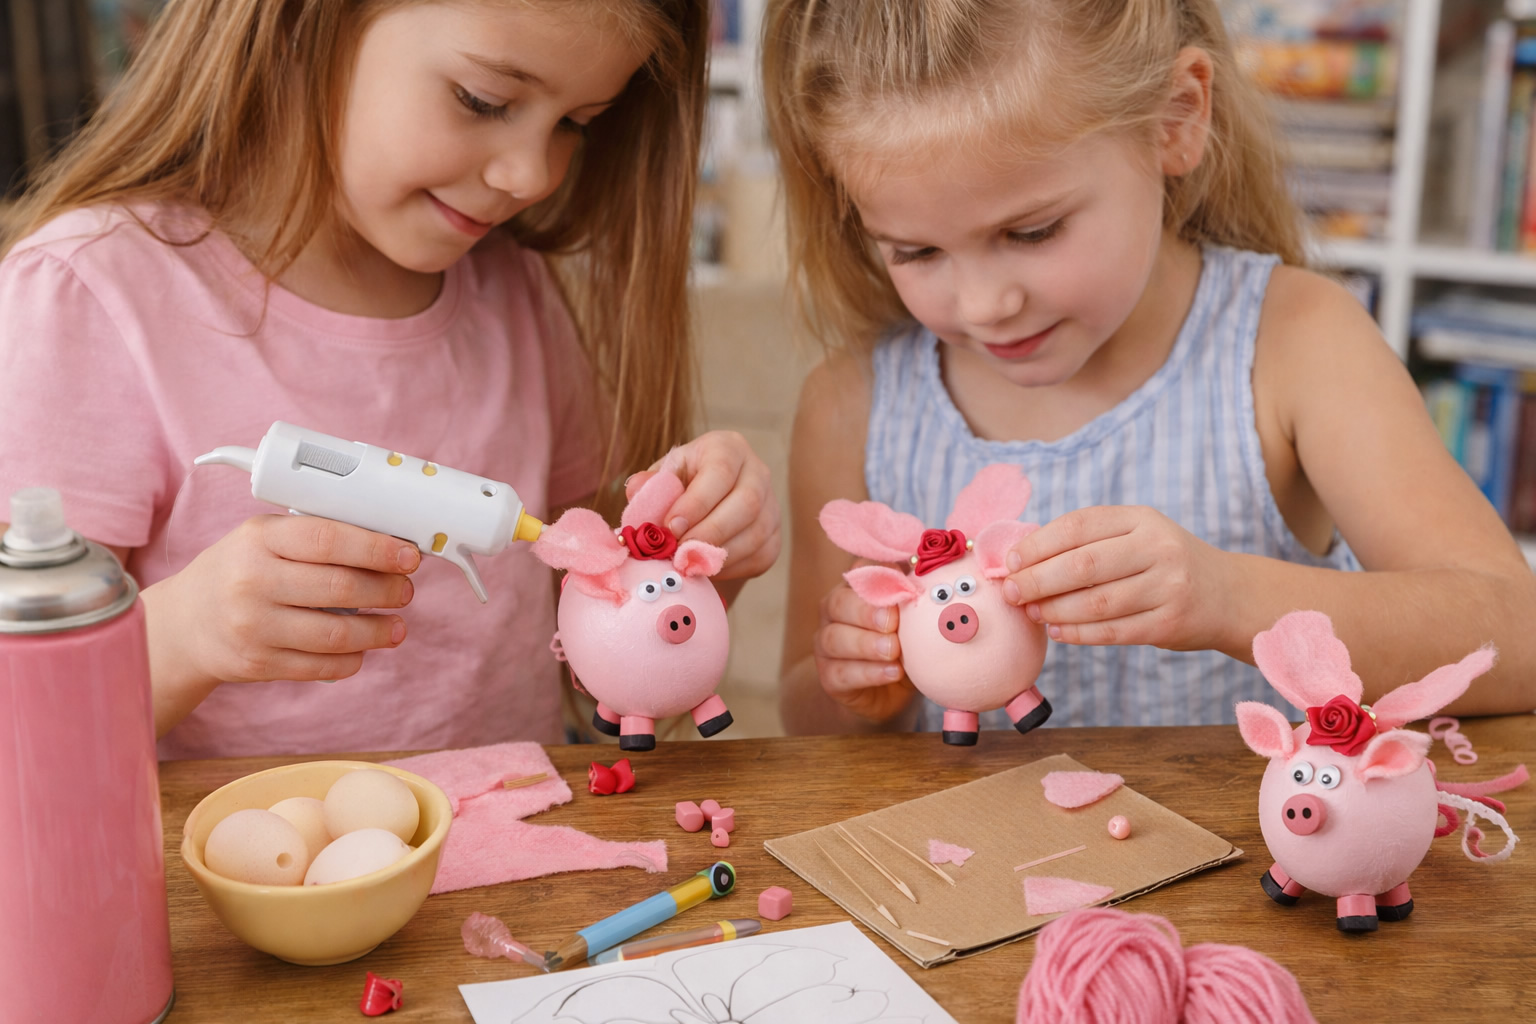
These Flying Pigs Easter Eggs are a whimsical Easter craft that will make everyone smile. They are especially fun as keepsake decorations to hang from a chandelier, Easter tree, or spring display. Because real blown eggs are very fragile, this project is best for careful teens or adults to make, but kids will still love seeing these silly little pigs on display.
Supplies
- Blown eggs
- Bowl
- Pink spray paint
- Wiggle eyes
- Pink felt
- 3/8-inch head plugs
- Toothpicks
- Black permanent marker
- Hot glue gun
- Long hat pin
- Small red rose
- Pink pipe cleaners
- Bracelet spacer
- Lightweight yarn or clear thread for hanging
Instructions
- Pierce both ends of an uncooked egg with a long hat pin. Blow the egg contents into a bowl until the shell is empty. Wash the egg thoroughly and let it dry completely.
- To paint the egg, stick one end of a toothpick into an egg carton and carefully insert the other end into one of the egg holes. Spray paint the egg pink and let it dry.
- Paint four head plugs pink for the legs. Use a black permanent marker to draw little hooves on each one.
- Paint one more head plug pink for the snout. Draw two nostrils on it with the black marker.
- Glue the legs and snout onto the egg to form the pig’s body.
- Print the wing and ear patterns, then cut the pieces from pink felt.
- Pinch the bottom edge of each ear slightly to shape them, then glue them onto the pig.
- Shape the wings using the pattern as a guide, then glue them onto the pig.
- Glue a small red rose behind one ear for a sweet finishing touch.
- Curl a short piece of pink pipe cleaner to make the tail, then glue it to the back of the pig.
- Glue the bracelet spacer over the top hole in the egg. This helps support the hanging thread or yarn.
- Add lightweight yarn or clear thread so your Flying Pig Easter Egg is ready to hang.
Tips
- Handle the blown eggs very gently at every step.
- Let the paint dry fully before gluing on details.
- A cardboard egg carton makes a great drying stand while painting.
- Wrap each finished egg in tissue paper for storage so you can enjoy them again next Easter.
Fun Facts
Pigs have appeared in folk sayings and stories for centuries, and a “flying pig” is often used to describe something funny or impossible. That is one reason these Easter eggs are such a playful holiday decoration.
Patterns, Templates and Printables
Click on the pattern to open it in a new window.


Teacher Friendly Educational Extension
This craft can be used as a creative writing prompt for older kids. Ask them to imagine where a flying pig might go on Easter morning and write a short story about its adventure. In a classroom, students could also compare real pigs to imaginary flying pigs and make a list of realistic and pretend traits.
Supplies
Blown Eggs
Bowl
Pink Spray Paint
Wiggle Eyes
Pink Felt
3/8" Head Plugs
Toothpicks
Black Sharpie Permanent Marker
Hot Glue Gun
Long Hat Pin
Small Red Rose
Pink Pipe Cleaners
Bracelet spacer
Instructions
Start by piercing the two ends of uncooked eggs with a long hat pin. See the picture if this is unfamiliar to you. Then blow into one end of the egg until all of the egg white and yolk drains out the other end into a bowl. You can also suck the egg out and according to Vivian this is much faster.
Wash your egg thoroughly and let dry.
Paint egg and let dry by poking one end of the toothpick into an egg carton and inserting the other end of the toothpick into one of the holes in the egg.. (see picture)
Using the picture as a reference, paint 4 head plugs (found in your local hardware store) pink for legs and draw on hooves with black marker. Paint one head plug pink for snout and draw on nostrils with black marker.
Glue legs and snout to pig body.
Print out pattern for wings and ears and cut out of pink felt.
Pinch bottom edge of triangle to form ears and glue to pig. (See picture)
Using the picture as a reference pinch wings as indicated on the pattern and glue to pig.
Glue flower behind pig's ear.
Curl a small length of pipe cleaner and curl then glue on for pig's tail.
Glue bracelet spacer to top of pig covering the hole. This acts as a support for your clear thread if you want to hang your pig or you can use a light weight yarn as Vivian did. Click on the chandelier picture below for a better look at her collection.
Editor's Note: If you plan on saving these from year to year, wrap individual eggs carefully in tissue paper and pack in a sturdy box so they don't break.
Patterns, Templates and Printables
Click on a pattern to open it in a new window
Other Images
Click on an image to open it in a new window
Contributor

These projects are created by Terri, Betty, Jamie or one of the talented staff members at MakingFriends.com. They have been created exclusively for publication on FreeKidsCrafts.com with supplies you'll be able to find around your house.