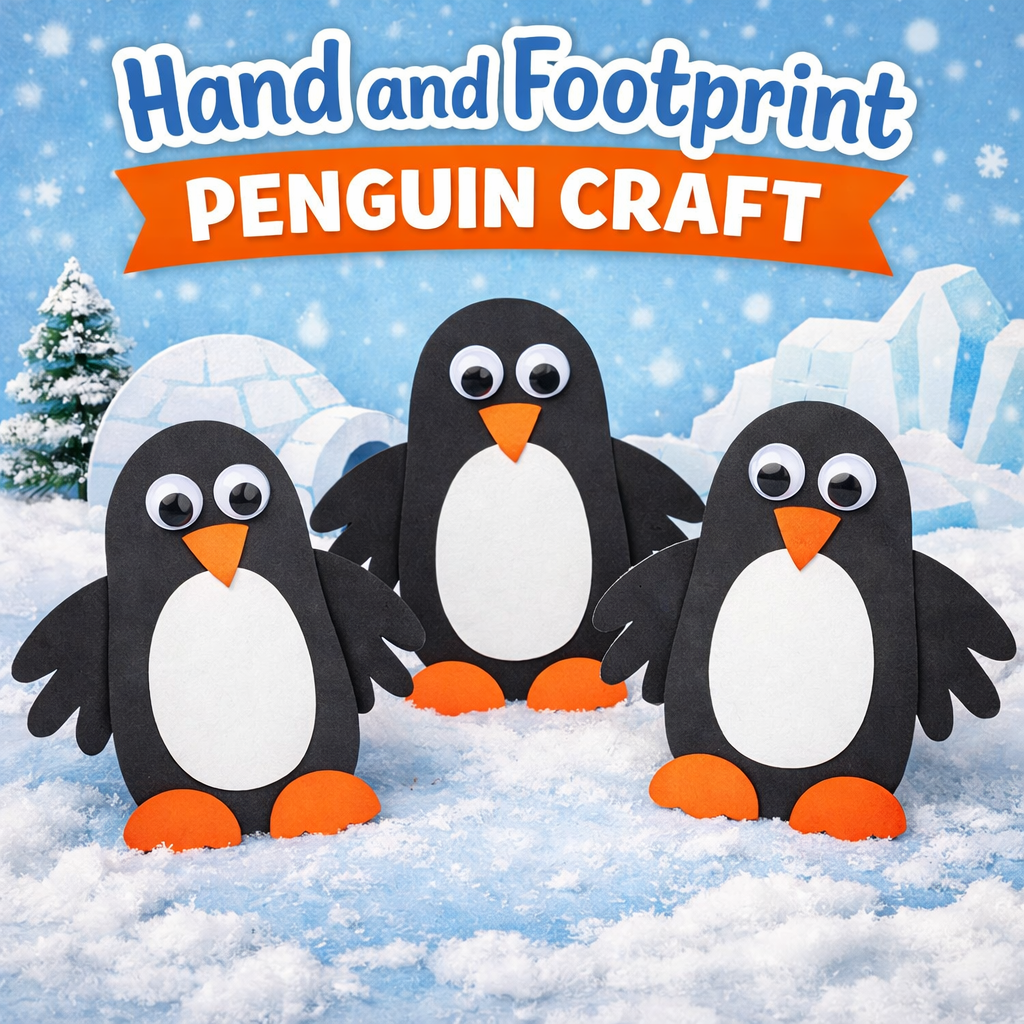
Hand and Footprint Penguin
This Hand and Footprint Penguin craft is a sweet and simple winter activity for little kids. There is no messy paint involved, which makes it perfect for classrooms, daycare, or a cozy afternoon at home. These adorable penguins look wonderful lined up on a bulletin board and make a fun keepsake for families.
This easy craft for kids is great for practicing tracing, cutting, and gluing skills while creating something they will be proud to show off.
Books to Read Along
Pair this craft with a fun penguin themed story time.
• Mr. Popper’s Penguins by Richard Atwater
• Cinderella Penguin: or, The Little Glass Flipper by Janet Perlman
• I Like It When . . . by Mary Murphy
Reading together before or after crafting makes this a wonderful literacy based classroom activity.
Supplies
Black construction paper
White construction paper
Orange construction paper
Pencil
Scissors
Glue
Wiggle eyes
Instructions
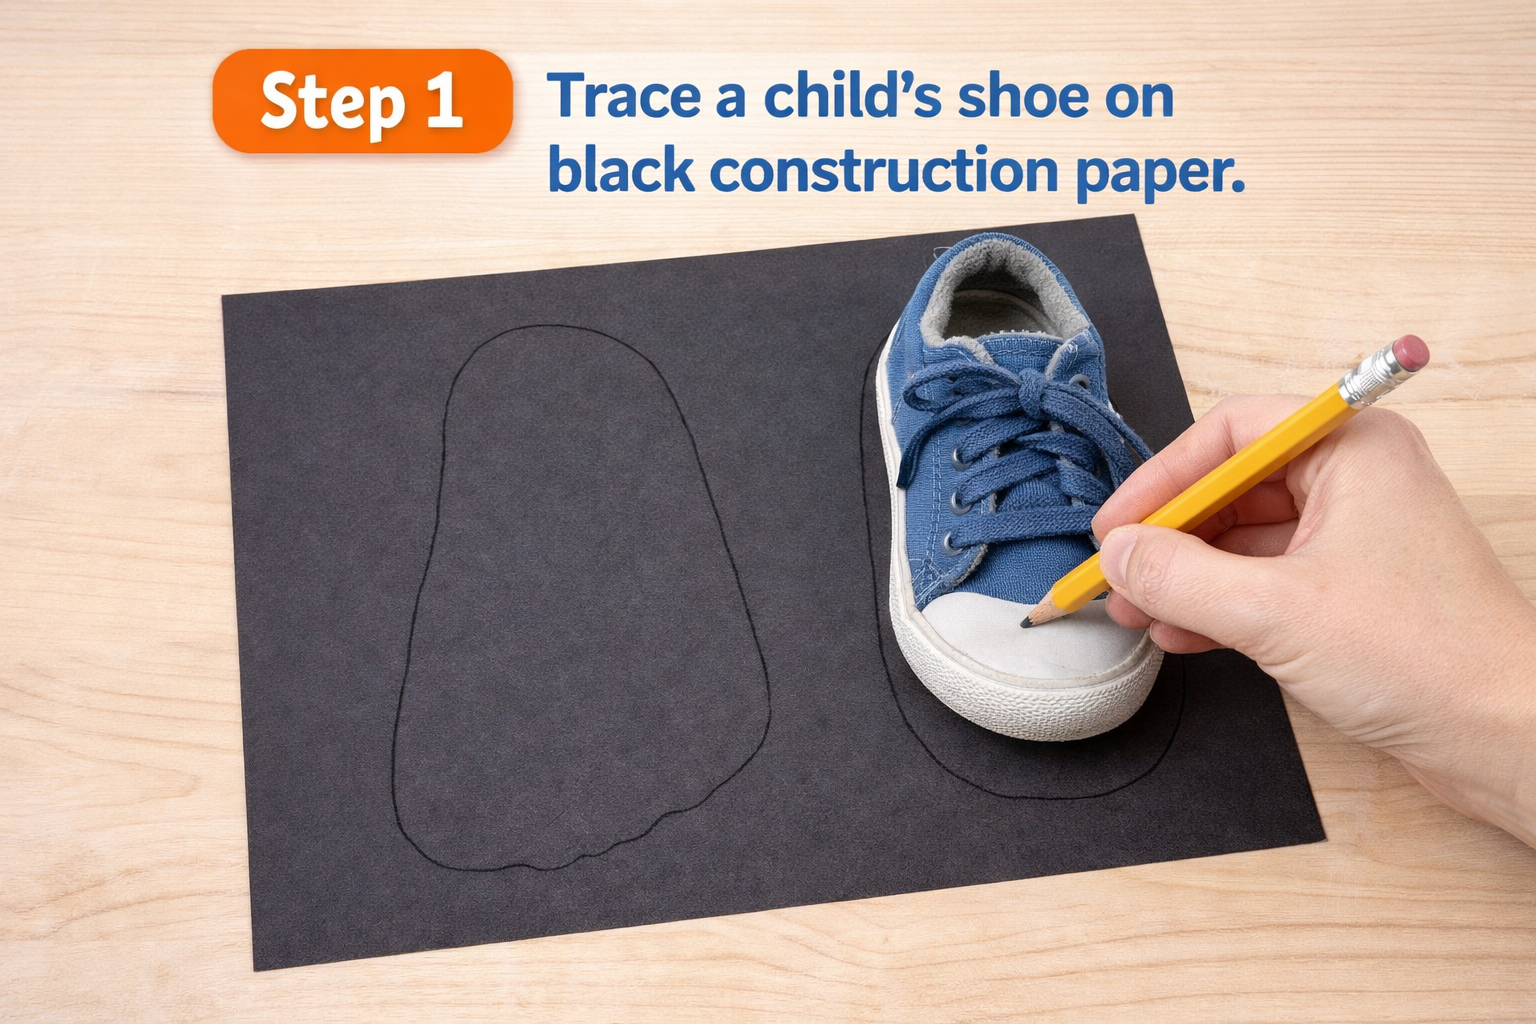
Step 1: Make the Penguin Body
Have each child trace around a shoe onto a piece of black construction paper. This will form the penguin’s body. Carefully cut it out.
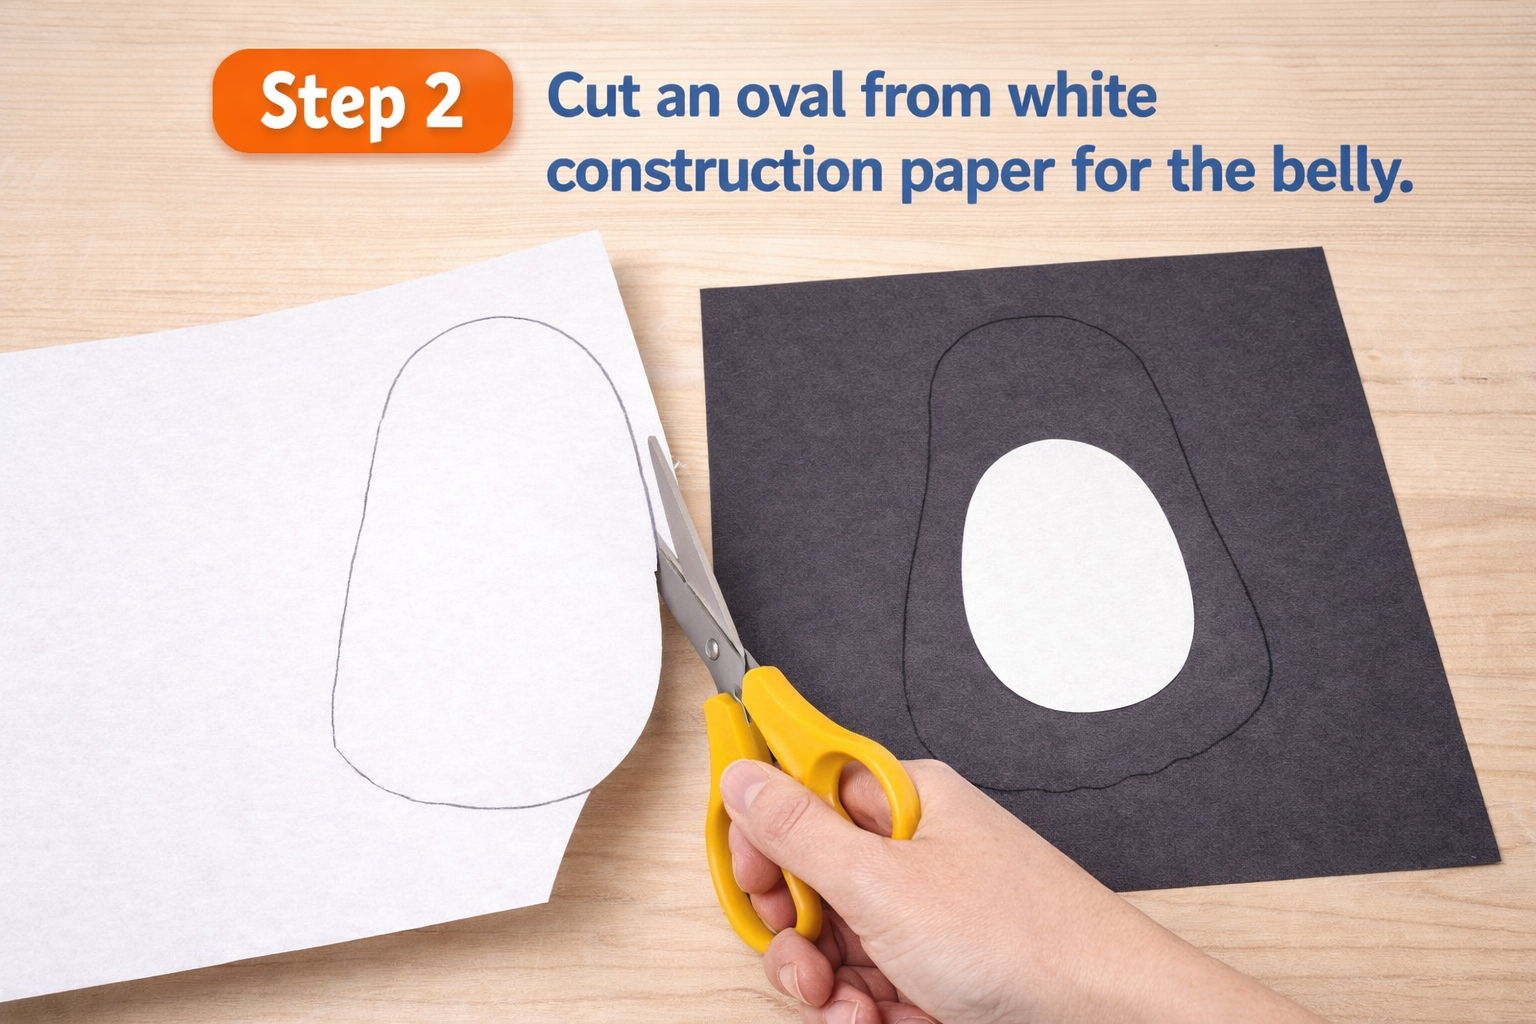
Step 2: Add the Belly
Cut an oval shape from white construction paper for the penguin’s belly. Glue it onto the center of the black body.
Step 3: Create the Wings
Fold a piece of black construction paper in half. Ask the child to squeeze their fingers together and trace around their hand on the folded edge. Cut it out while the paper is still folded. When opened, you will have two matching wings.
Glue the wings behind the body so they peek out from each side.
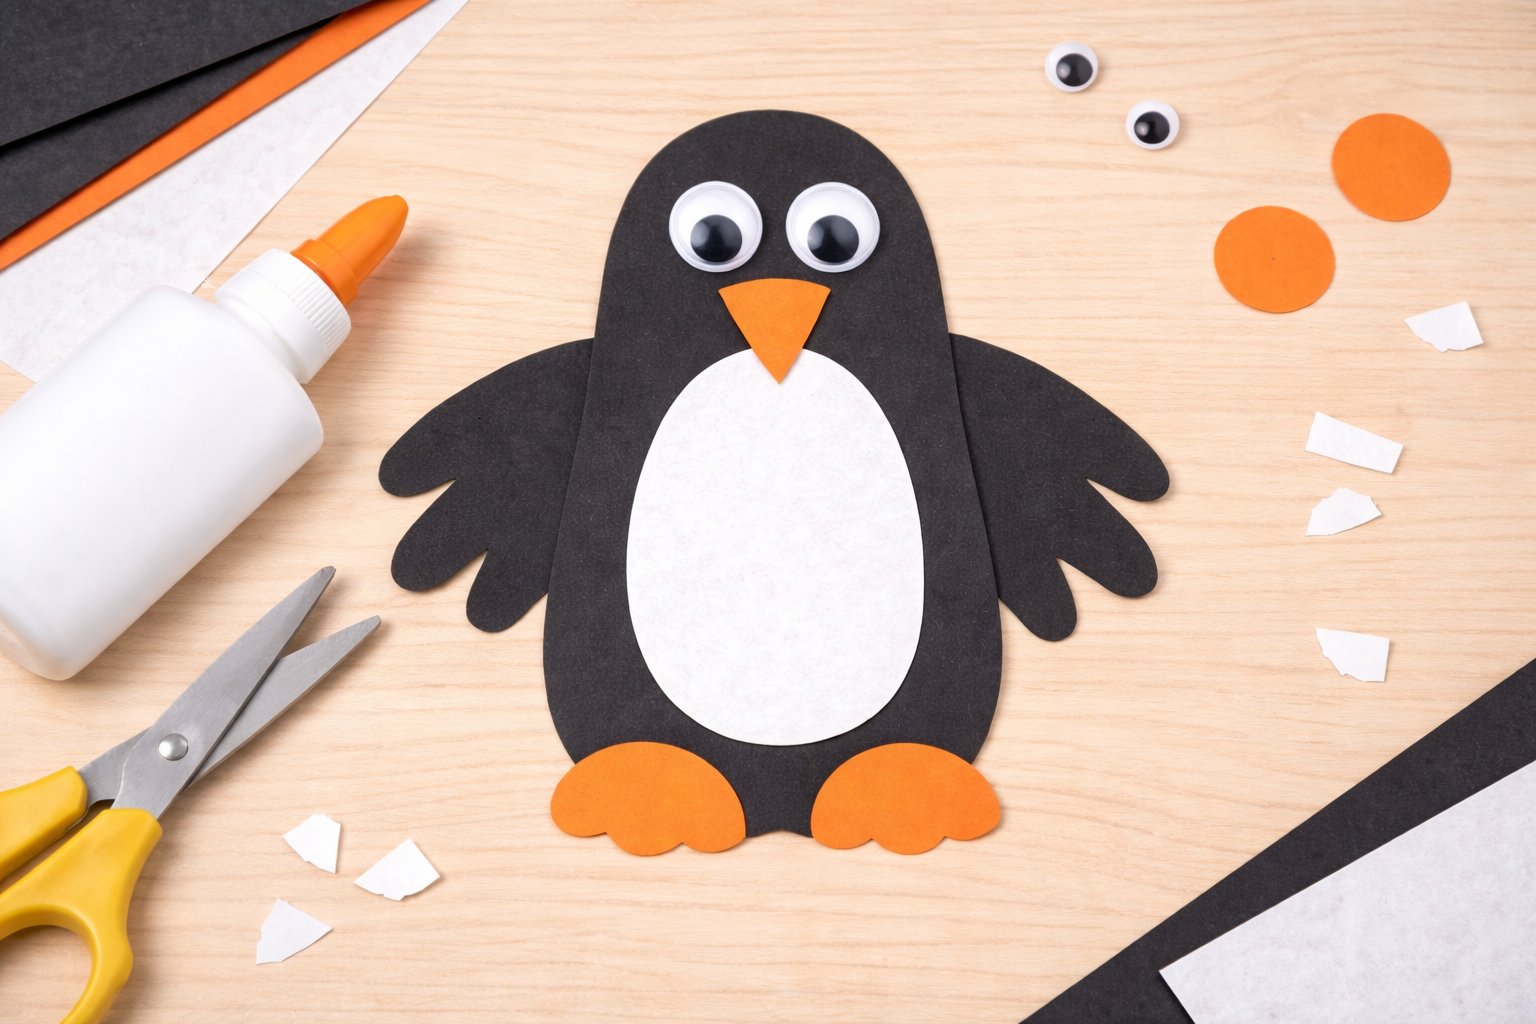
Step 4: Add the Face
Glue on two wiggle eyes. Cut a small triangle from orange construction paper and glue it in place for the beak.
Step 5: Make the Feet
Cut a 1 to 2 inch circle from orange construction paper. A lid or small bottle works great as a tracing guide. Cut the circle in half to create two feet. Glue them at the bottom of the penguin body.
Your hand and footprint penguin is complete.
Fun Facts About Penguins
Penguins are birds, but they cannot fly.
They use their wings to swim through the water.
Most penguins live in the Southern Hemisphere.
Penguins huddle together to stay warm in very cold weather.
Adding fun facts makes this craft even more engaging for kids.
Teacher Friendly Educational Extension
This craft can easily turn into a mini lesson.
Writing Activity
Have students write one or two sentences about their penguin. Younger children can dictate their sentence for an adult to write underneath.
Math Connection
Measure the shoe outline and compare sizes. Create a simple graph showing how many penguins were made by boys and girls or by shoe size ranges.
Science Connection
Discuss where penguins live and locate Antarctica on a map. Talk about how penguins stay warm and how their coloring helps them blend into their environment.
Bulletin Board Idea
Create a winter themed display titled “Our Class is Cool” and arrange the penguins together like a colony.
This Hand and Footprint Penguin craft is a wonderful addition to your collection of winter crafts and classroom activities. It is simple, creative, and perfect for little hands.

Hand and Footprint Penguin
Supplies
- Black construction paper
- White construction paper
- Orange construction paper
- Pencil
- Scissors
- Glue
- Wiggle eyes
Instructions
- Make the Penguin Body. Have each child trace around a shoe onto a piece of black construction paper. This will form the penguin’s body. Carefully cut it out.

- Add the Belly. Cut an oval shape from white construction paper for the penguin’s belly. Glue it onto the center of the black body.
- Create the Wings. Fold a piece of black construction paper in half. Ask the child to squeeze their fingers together and trace around their hand on the folded edge. Cut it out while the paper is still folded. When opened, you will have two matching wings. Glue the wings behind the body so they peek out from each side.
- Add the Face. Glue on two wiggle eyes. Cut a small triangle from orange construction paper and glue it in place for the beak.
- Make the Feet. Cut a 1 to 2 inch circle from orange construction paper. A lid or small bottle works great as a tracing guide. Cut the circle in half to create two feet. Glue them at the bottom of the penguin body.
Supplies
Black, White and Orange Construction Paper
Pencil
Scissors
Glue
Wiggle Eyes
Instructions
Each child should trace around a shoe on a piece of black construction paper. Cut out.
Cut an oval for the belly out of white constuction paper. Glue in place.
Fold a piece of black construction paper in half. Have the children squeeze their fingers together and trace around that hand on the folded piece black constuction paper. Cut out. You will have two hands. Position behind the penguin body for wings. Glue in place.
Glue on wiggel eyes. Cut a small triangle for a beak.
Cut out a 1" - 2" circle on a piece of orange construction paper. You can use a lid or bottle to make it easier. Cut the circle in half and glue in place for feet.
Contributor

These projects are created by Terri, Betty, Jamie or one of the talented staff members at MakingFriends.com. They have been created exclusively for publication on FreeKidsCrafts.com with supplies you'll be able to find around your house.