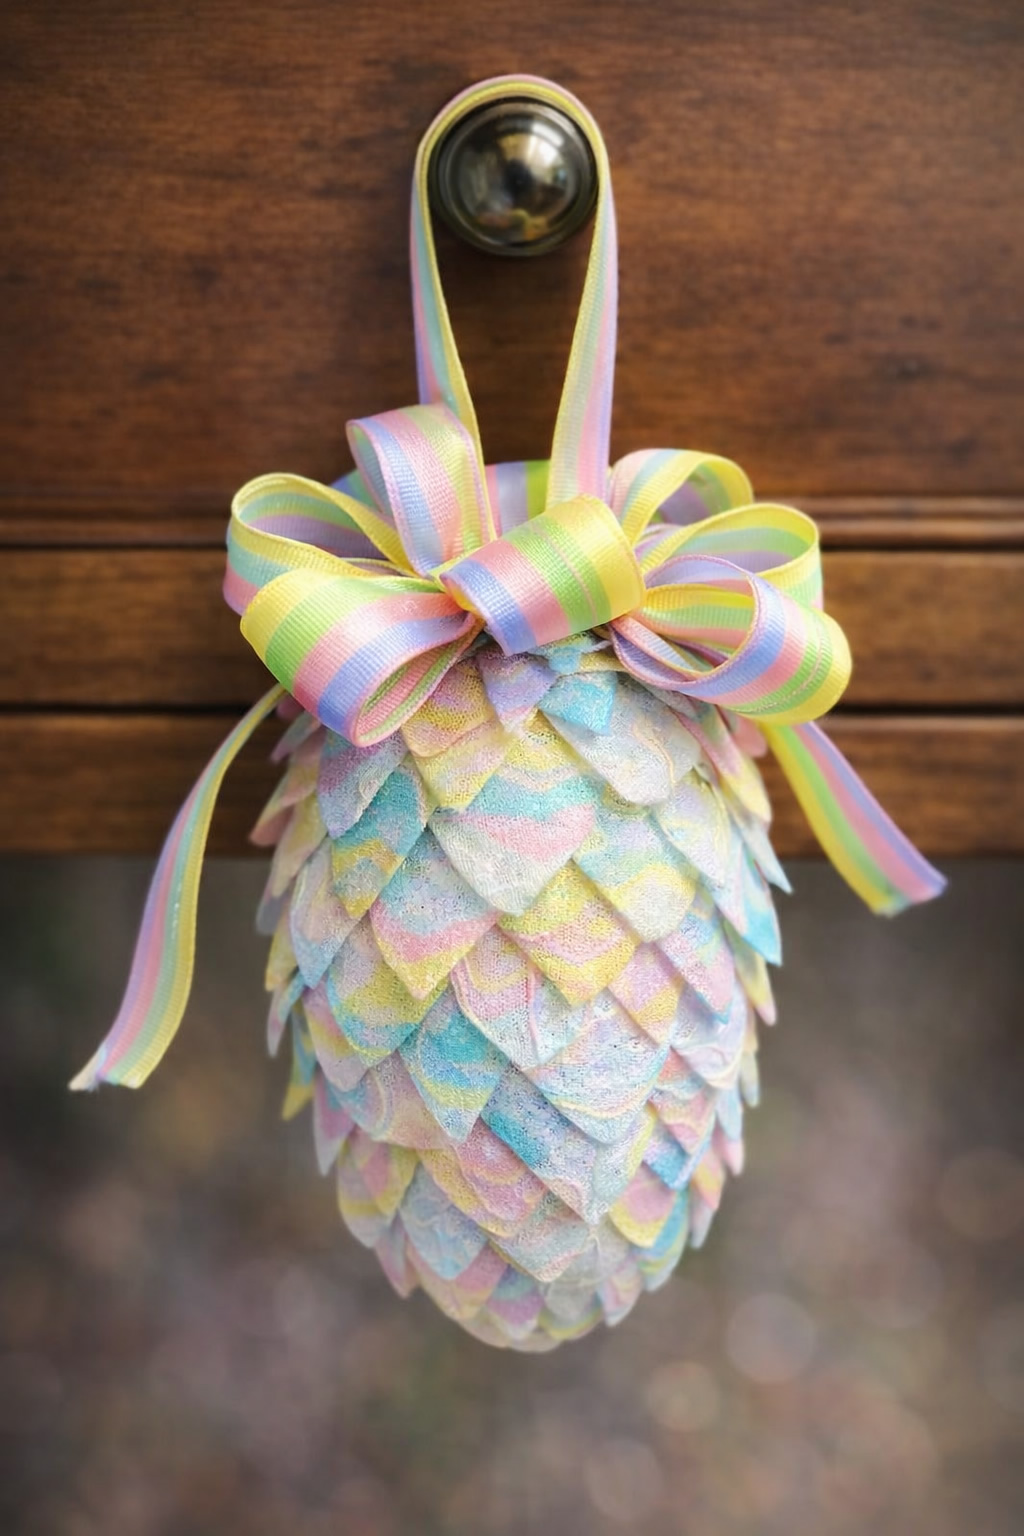
Pine Cone Shaped Easter Ornament
Turn ribbon and a Styrofoam egg into a beautiful pine cone shaped Easter ornament that looks lovely hanging on an Easter tree, from a spring branch display, or around the house. This elegant Easter craft is a fun way to create handmade holiday decorations with colorful ribbon and simple supplies.
Fun Facts
Pine cone style ribbon ornaments are a popular no-sew craft that use folded fabric or ribbon pieces to create a layered texture. The finished design looks detailed and fancy, but it is made with simple repeated folds and pins.
Supplies
- 100 size 17 satin pins
- 1 Styrofoam egg, 3 1/16 x 2 5/16 inches
- Scissors
- About 50 ribbon pieces cut to 2 x 1.25 inches
- 2 pieces of ribbon, 11 inches long
- 4 pieces of coordinating ribbon, 4.5 inches long
- 10 to 12 pieces of coordinating ribbon, 4 inches long
Instructions
- Start by cutting your ribbon into pieces about 2 inches long and 1 to 1.5 inches wide. You will need around 50 pieces for the folded sections that create the pine cone look.
- Cover the pointed tip of the Styrofoam egg with two ribbon strips placed in a cross shape. Pin each strip down at the edges so the tip is fully covered.
- Take one of the cut ribbon pieces and fold the top corners together to make a triangle. If your ribbon has a front and back, fold it so the pretty side faces out.
- Place the folded triangle near the tip of the egg and pin the sides to hold it in place. Continue adding folded triangles around the top until you have four pieces surrounding the tip.
- Keep folding and pinning ribbon triangles in overlapping rows, working your way down the egg like roof shingles. Continue until most of the egg is covered, leaving about 2 inches exposed at the top.
- Pin the four 4.5-inch coordinating ribbon pieces around the middle of the egg so they hang down evenly on all four sides.
- Take the two 11-inch ribbon pieces and form each one into a loop. Place one loop on top of the exposed area and pin it down. Add the second loop across the first one so it forms a cross shape and covers the remaining Styrofoam.
- Fill the center top area with extra ribbon loops made from the 4-inch ribbon pieces. Keep adding loops until the top looks full and decorative.
- Finish by pinning in a larger ribbon loop at the top so you can hang your ornament on an Easter tree or display.
Tips
Choose Easter-themed ribbon with soft spring colors for a bright seasonal look.
Wired ribbon works especially well for the top loops because it holds its shape nicely.
Adult supervision is helpful since this project uses many straight pins.
Patterns, Templates and Printables
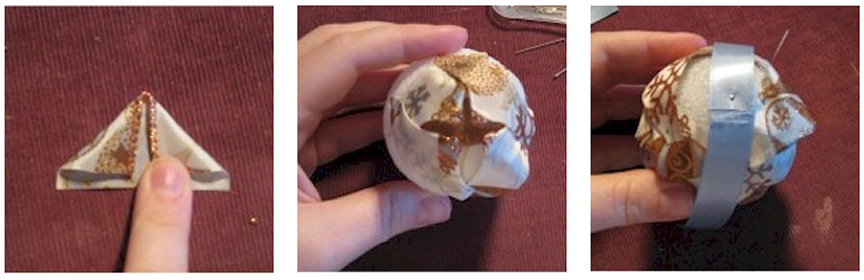
See example images for close-ups of the folding and pinning process to help guide your ornament assembly.
Teacher Friendly Educational Extension
This project is a nice activity for older kids and teens who are working on fine motor skills, following directions, and pattern repetition. It can also be used as a lesson in symmetry, color coordination, and decorative design. In a classroom or homeschool setting, students can create ornaments in different holiday color themes and compare how changing the ribbon affects the final look.
Supplies
100 size 17 satin pins
One 3 1/16" x 2 5/16" Styrofoam egg
Scissors
50 pieces of ribbon cut 2" x 1.25"
Two 11" pieces of ribbon
Four 4.5" pieces of coordinating ribbon
Ten to twelve 4" pieces of coordinating ribbon
Instructions
The first thing you need to do is cut your ribbon to size. I was using 2.5″ wide ribbon so I just cut it straight down the middle. You will need about 5 feet of wide ribbon, cut in half, to give you enough to make approximately 50 pieces that are 2″ by 1.25″. It doesn’t have to be exact, but make sure your ribbon pieces are about 2″ long and between 1″ and 1.5″ wide. These ribbon pieces will make up the bulk of your finished ornament, so pick ribbon you really like!
Now, it is time to start pinning! First, you need to cover the tip of the ornament with two crossed over pieces of ribbon. Just center one piece and pin the four edges down and then lay another piece on perpendicular to the first and pin those four edges down. This will conceal the tip of your Styrofoam egg to act as our starting point.
What you will want to do now is take one of the cut ribbon pieces and fold it into a triangle tipped point by bringing the two top corners together. If your ribbon has a front and a back, make sure you fold it so that the front of the ribbon is on the finished side where you don’t see the fold. Eventually, you will do this to all of the pieces but you have to do it one at a time since they will come unfolded if you don’t hold them.
Take this piece and place it on top of the two strips you placed across the tip. You will want four pieces encircling the top so that the tips of your ribbon triangles meet in the middle if you press them all together. Take two pins and insert them along the sides to hold the ribbon in place and keep it folded into the triangle shape. Don’t worry, once you start overlapping all of these triangle shapes, you will not see a single pin.
Continue folding your triangles and pin them in alternating rows, like roof shingles, until you cover almost the entire egg. You will have about 2 inches of exposed Styrofoam at the top of your egg when you can stop pinning your triangles.
Pull out your coordinating ribbon and cut four pieces that are approximately 4.5″ long. Pin one end of each ribbon to the middle of your egg so that the ribbons dangle down on four sides. Don’t worry, we will cover the rest of the Styrofoam and exposed pins with the next layer of ribbon. Now, you will need your two 11″ pieces of ribbon. I used the same ribbon that I used for the triangle pieces but you can use yet another coordinating ribbon. Just make sure it has some wire or heft to it to hold a bit of shape. Form a loop with one of the pieces and center it over your dangling ribbon strips. Flatten the loop and insert a pin to hold it in place. Do the same thing with the other 11″ strip and pin it perpendicular to the first. The Styrofoam should now be completely hidden!
If you look at the top of your pine cone now, you have a bunch of empty space in the middle of the ribbon. You can fill this any way you like but I chose to make little ribbon loops out of the solid blue I used for the dangling pieces and yet another coordinating ribbon color. Feel free to use sprigs of greenery or anything else that coordinates with your base ribbon. Loop and pin ribbon pieces until the middle has a full look. The final piece you need is one large loop to hang the pine cone from your tree.
Other Images
Click on an image to open it in a new window


Contributor
"We are Chica and Jo and we are crafty, frugal, and fun! We will help you unlock your inner crafter with new and creative projects, using inexpensive, everyday items. Visit us whenever you need ideas, crafts, or inspiration for just about anything! Our hundreds of free tutorials loaded with photos and video make us your ultimate online guides for all things crafty."