Beaded Safety Pin Angel Ornaments
Beaded safety pin angel ornaments are a beautiful Christmas craft for kids, families, and classroom groups. These sparkling angel ornaments look lovely on the tree and also make thoughtful handmade gifts for grandparents, teachers, and friends. You can make them in red, white, and blue, classic Christmas colors, or soft translucent shades for a frosty holiday look.

Supplies
- 5 safety pins, size 4
- 6 safety pins, size 2
- 49 red, white and blue pony beads or translucent pony beads
- 20 metallic pony beads
- White glue
- 30 inches metallic cord
- 1 wooden barrel bead, 16 mm
Instructions
- Cut the metallic cord to 30 inches. Stiffen both ends with a little white glue and let them dry. Fold the cord in half and tie a knot about 1/2 inch below the fold.
- Choose bead colors for the wings. Open the six size 2 safety pins and add beads. Four of the pins should have 4 beads each. Two of the pins should have 3 beads each. Close all of the pins.
- Choose bead colors for the body. Open the five size 4 safety pins and add beads. Two of the pins should have 4 beads each. Two of the pins should have 5 beads each. One of the pins should have 6 beads. Close all of the pins.
- Thread 3 metallic pony beads onto one end of the cord. Take the other cord end and pass it through the same 3 beads in the opposite direction. Pull gently so the beads meet in the center.
- Thread the wooden barrel bead onto one cord end. Pass the other cord end through the same bead in the opposite direction. Add 1 metallic pony bead the same way to make the neck. Pull both ends evenly and firmly to tighten.
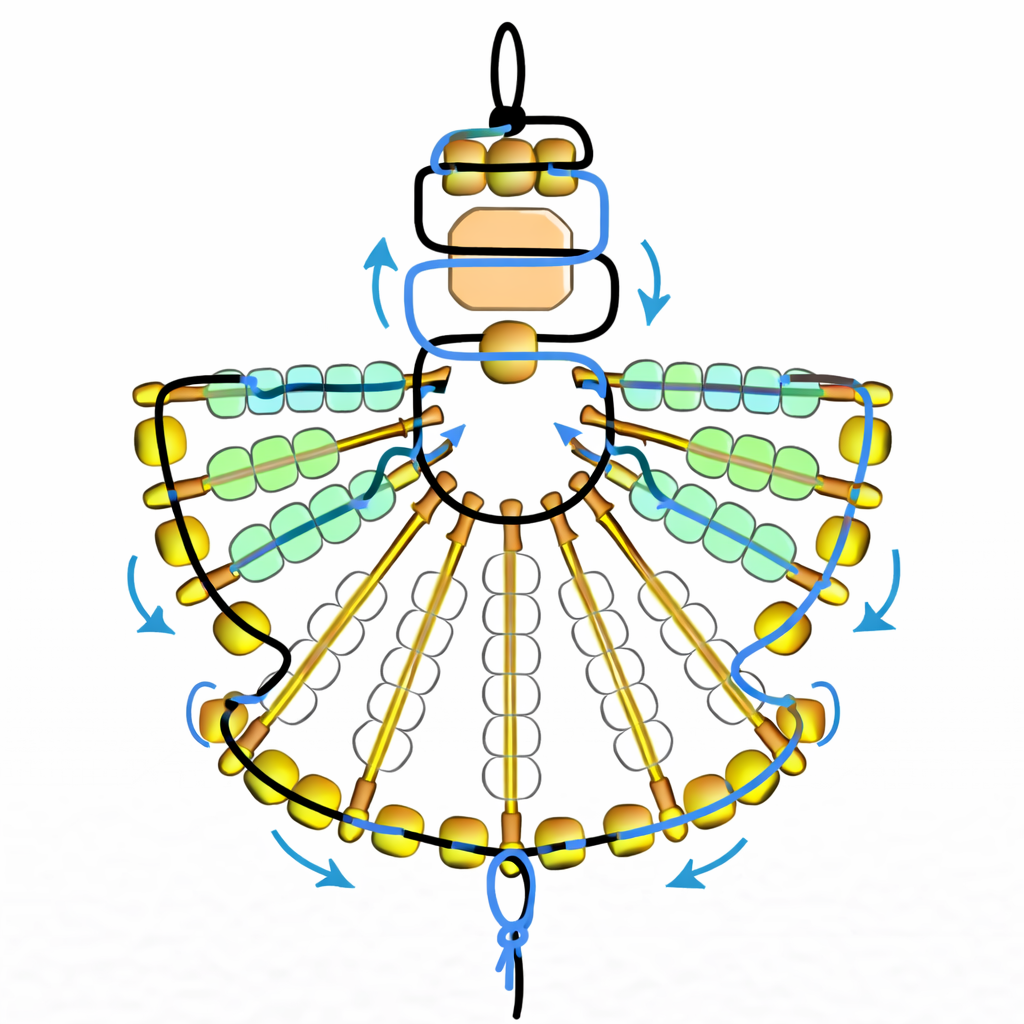
- Arrange the safety pins in the correct order for the angel shape. String the pins onto one side of the cord as shown in your printable diagram. Loop that cord back through the metallic neck bead to hold the safety pins in place.
- Continue weaving the cord through the openings and heads of the wing and body safety pins, adding metallic beads between sections as shown in the diagram. Repeat with the other cord end on the opposite side so the angel shape forms evenly.
- When the angel is finished, tie the cords securely under the middle safety pin. Add a small dab of white glue to the knot. Let it dry, then trim the ends.
- Use the loop at the top to hang your beaded angel ornament on the Christmas tree, attach it to a gift, or display it as part of holiday classroom activities.
Fun Facts
The safety pin was invented by Walter Hunt in 1849. He sold the rights to his invention for just $400. Today, safety pins are still used for sewing, fastening, and many creative crafts for kids.
Patterns, Templates and Printables
Click on a pattern to open it in a new window to print.

Teacher Friendly Educational Extension
This Christmas craft is a fun way to practice patterns, counting, and fine motor skills. Have children sort beads by color, count how many beads go on each pin, and compare the wing sections to the body sections. In a classroom, students can also write a short note about who they would give their angel ornament to and why. This makes the project a meaningful holiday craft with both art and writing connections.
Supplies
Instructions
Patterns, Templates and Printables
Click on a pattern to open it in a new window

Contributor

These projects are created by Terri, Betty, Jamie or one of the talented staff members at MakingFriends.com. They have been created exclusively for publication on FreeKidsCrafts.com with supplies you'll be able to find around your house.