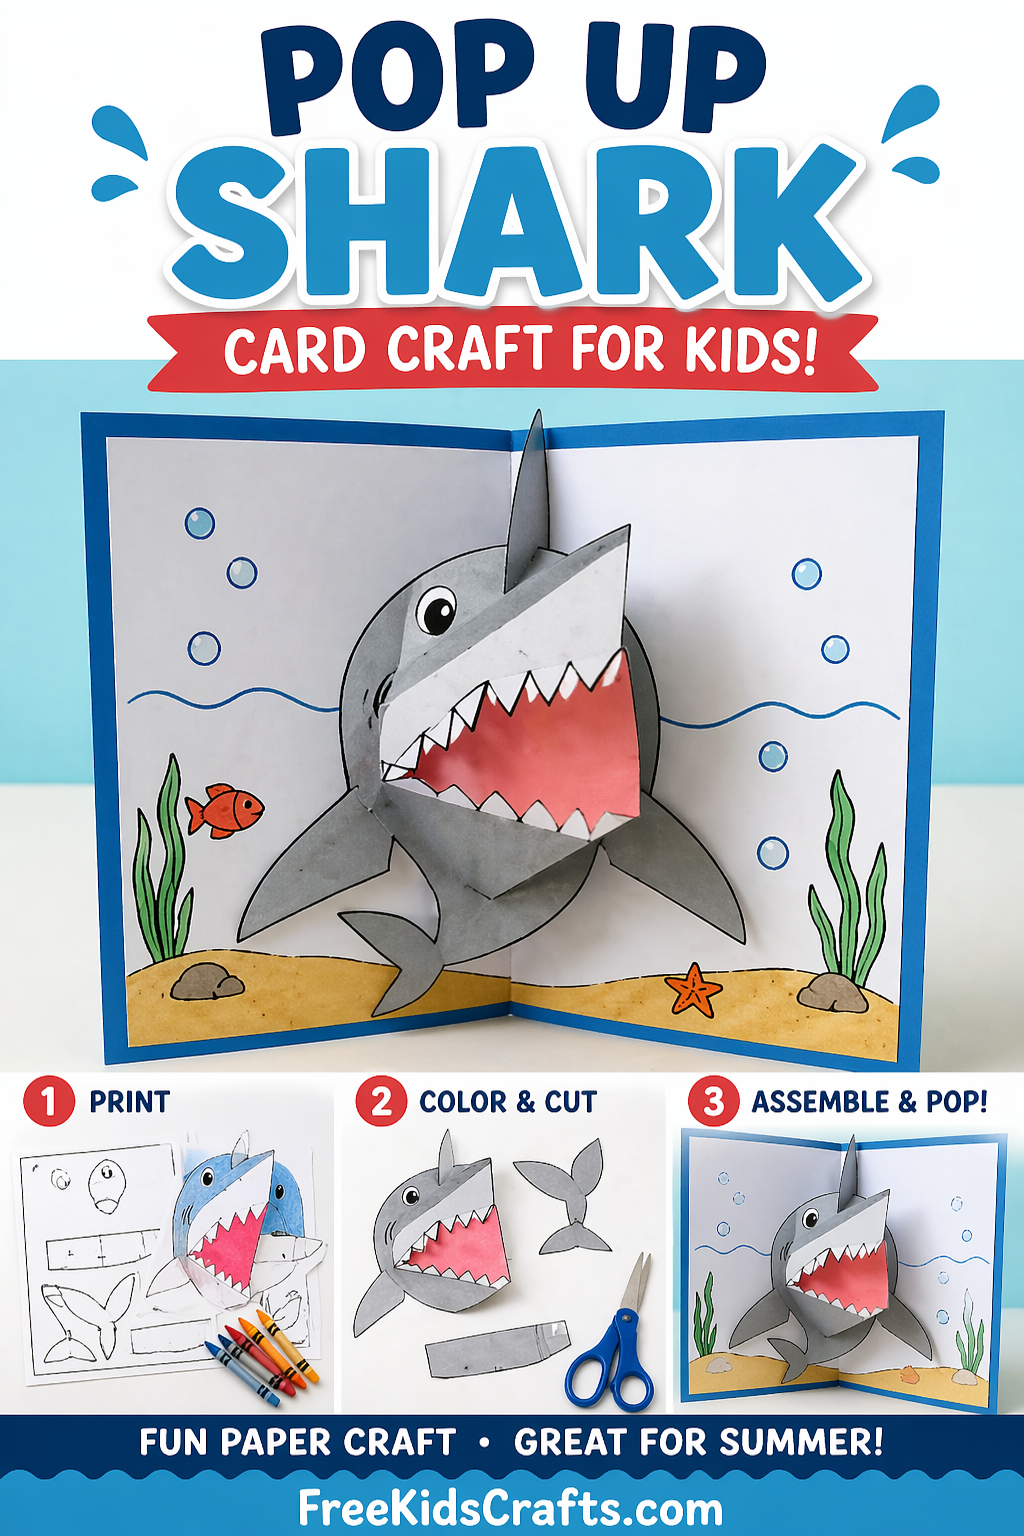
Pop Up Shark
Bring a little ocean adventure to your craft table with this fun Pop Up Shark card. Kids will love watching their shark “jump” right out of the page when the card opens. It is a great summer activity and a perfect mix of coloring, folding, and simple construction.
This project works well at home or as a classroom activity and is a fun way to explore basic paper engineering.
Supplies
- Heavyweight paper or cardstock
- Printer
- Scissors
- Glue stick or craft glue
- Ruler
- Empty ballpoint pen or paper clip (for scoring folds)
- Crayons, markers, or colored pencils
Instructions
Step 1: Print and Prep
Print the shark template on cardstock or heavy paper. Use a ruler and the rounded tip of a pen or paper clip to gently score along all dotted fold lines. This helps create clean, crisp folds.
Step 2: Color and Cut
Color all the shark pieces before cutting. Avoid coloring over any areas marked “glue here.” Carefully cut out all pieces along the solid lines. Do not cut out the eyes.
Step 3: Fold the Pieces
Fold each piece along the scored lines:
- Fold the shark head sections backward in sequence
- Fold the jaw piece along the center and fold tabs upward
- Fold the fin along the center and crease the tabs
Take your time with folding. Clean folds make the pop-up effect work better.
Step 4: Assemble the Shark Card
Fold the main card in half and reopen it flat.
- Glue the fin to the upper inside section of the card
- Attach one side of the shark head tab to the left side and let dry
- Add glue to the other tab, close the card gently to align it, and let it dry completely before reopening
- Glue the jaw piece to the lower inside section
Once everything is dry, slowly close and open the card to see your shark pop up.
Tips for Success
- Let glue dry fully before moving to the next step
- Use light amounts of glue to avoid wrinkling the paper
- Encourage kids to decorate the background with ocean scenes, fish, or bubbles
Patterns, Templates and Printables
Print the shark template to get started. The printable includes all pieces and fold guides to help make assembly easy and fun.


Teacher Friendly Educational Extension
This craft is a great introduction to simple engineering concepts and sequencing.
- Science Connection: Talk about sharks and their role in ocean ecosystems
- Writing Prompt: Have kids write a short story about their shark and what it is doing
- Art Skills: Practice coloring, cutting, and folding precision
- STEM Idea: Discuss how folds and tabs create movement in paper designs
Supplies
Heavyweight paper or cardstock
Sharp Scissors
Instructions
Click on Printables and print out the shark cards on a heavy paper, like card stock or construction paper. We're put all of the illustrated instructions on printable sheets too.
Using a ruler as a guide, take the rounded end of a paper clip (or a ballpoint pen that has run out of ink) and press along the dotted lines of the pop-up pieces.
Using a ruler as a guide, take the rounded end of a paper clip (or a ballpoint pen that has run out of ink) and press along the dotted line on the center of the card. Go all the way from the top to the bottom of the card! Color in all the pieces for the shark using markers or crayons.
Carefully cut out the pop-up pieces for the shark following the solid, black lines. DO NOT CUT OUT THE EYES.
Color in all the pieces for the shark using markers or crayons. DO NOT color over the areas marked "glue here." Carefully cut out the shark's card following the solid, black lines.
Take the piece of the shark's head that has the eyes on it and folding along the snout, fold both sides back away from you.
Moving to the right, fold the next section of the head back.
Continue moving to the right and fold the next section of the head back.
Continue moving to the right and fold the tab of the head back.
Lay the shark head on a flat surface and apply a small amount of glue to the tab.
Begin to bring the tab to the other side of the head.
Press the glued tab firmly against the head. Lay the piece completely flat and set aside to dry.
Take the jaw piece and folding along the center line, fold both sides back away from you.
Turn the jaw piece completely over and lay it on a flat surface. Fold both tabs at the bottom all the way up and leave them in this position. Set this piece aside.
Take the shark's fin and folding along the center line, fold both sides back away from you.
Fold the right tab all the way up and then return to its original position.
Fold the left tab all the way up and then return to its original position. Set this piece aside.
Take the shark's card and fold it completely in half along the center line. Open the card up and lay on a flat surface.
Put a small amount of glue ONLY on the upper left area.
Put a small amount of glue ONLY on the upper right area.
Take the shark fin and carefully position over the two glue areas. Press the shark fin into the glue and let dry.
Put a small amount of glue ONLY on the middle left glue area.
Take the flattened shark's head and carefully place the left tab over the glue area. Let the head lay flat against the card with the tab glued. Let dry!
Put a small amount of glue on the remaining tab on the shark's head.
Without letting the shark's head move, carefully begin to close the card. The glued tab will automatically line up with the right side of the card into its position. DO NOT open the card once you've closed it.
IMPORTANT: YOU MUST LET THIS GLUE DRY! If you try to open the card too soon, the tab will come unglued.
After the glue has dried open the card.
Apply a small amount of glue to the lower left glue area.
Apply a small amount of glue to the lower right glue area.
Take the shark's jaw (with the tab still folded underneath)... and carefully position over the glue areas.
Press the jaw firmly into the card. Let dry!
After the glue has dried, carefully begin to close the card.
Your pop-up shark is hungry and ready for lunch!
Patterns, Templates and Printables
Click on a pattern to open it in a new window
Contributor
Robert works in his studio in New York City that he shares with his partner, children's book creator Matthew Reinhart. When asked about his work, Robert says, "We love making books. It's hard work but the best part is not having to worry about making a mess. When being an artist is your job, you can make as many messes as you want to!"